Join me over this sellers series as I walk you through the 14 steps of the sellers’ timeline.
Step 3: Professional Photos of your home
Why bother with real estate photography?
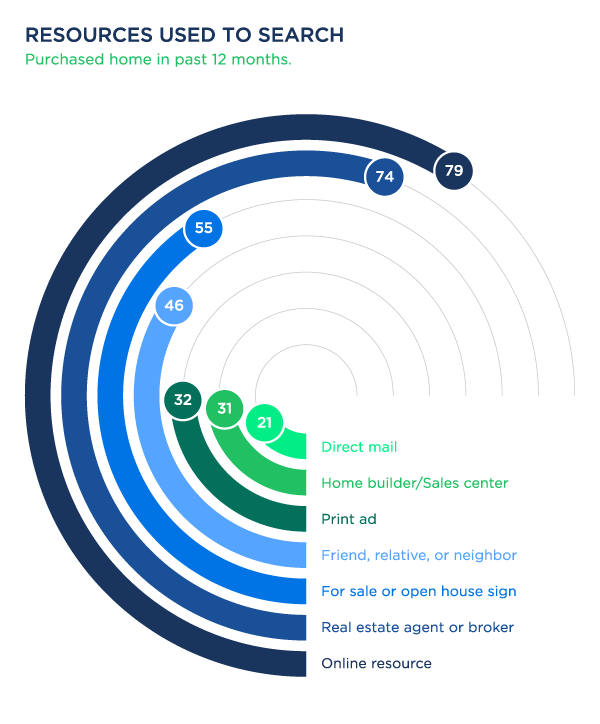
Seventy-nine percent of recent home buyers told Zillow they shopped online to find their home. What’s more, of buyers who purchased in the last 12 months, almost half said that viewing professional photos was extremely or very important to their home-buying experience.
In today’s online world, your home’s photos are your first impression, and they’re the best way to pique a buyer’s interest to have them come see your listing in person.
Your home’s online listing isn’t the only place your photos will come in handy. They’ll make your home look great wherever it’s advertised: in signage, open house flyers, social media posts where friends and family share your listing, and when your agent shares the listing with other agents in their network — all of which are places today’s buyers are looking. 
From the Zillow Group Consumer Housing Trends Report 2017.
Prepare the house for real estate photography
Whether you’re hiring a pro or acting as a do-it-yourself real estate photographer, the first step is the same: Get your house photo ready! This is the time to really put the effort into making your house look picture perfect. There’s no point in taking photos if your house isn’t looking its best.
- Clean the house: Do a deep clean of every room in the house, either by bringing in a professional cleaning service or dedicating a weekend to doing it yourself. Wash the windows (inside and outside), make the beds, dust, vacuum, and get those fingerprints off your stainless steel appliances.
- Declutter: There’s nothing worse in real estate pictures than clutter. Clear the kitchen counters of small appliances, tuck away bathroom items like toothbrushes and combs, remove any eyesore cords or wires, put your TV remotes in a cabinet, and finally go through that stack of mail. Remember, if you’re going to be photographing your garage or workshop, make sure to clean there too.
- Depersonalize: You’ll want to ensure buyers can picture themselves living in the home, and they can’t do that with your personal belongings in every picture. Take a few minutes to stash away things like family photos, refrigerator magnets, toys, and pet accessories.
- Downplay seasonal elements: Consider minimizing any holiday decorations or seasonal elements so that the photos are timeless.
- Stage each room: Go room by room with a critical eye, making small tweaks that can make a big difference: Open the blinds, turn on the lights, and add small touches that make the space feel welcoming.
- Remove window screens: Natural light is a big seller, and window screens dim natural light and make windows look dingy in photos. Consider removing your window screens before photos are taken, especially if you plan to capture high-value views.
- Add color: Make your photos stand out with splashes of color, like fresh flowers, a plush throw pillow, or a cozy blanket.
Join me next week as I share step 4 where I talk about listing your home on the MLS! Did you miss step 2? Catch it here!


